NO Churn Homemade Ice Cream

NO Churn Homemade Ice Cream

Best Homemade Ice Cream!!! No Churning needed!

Have you ever wanted to make your own ice cream? You will love this easy recipe. You only need 3 ingredients for the best vanilla ice cream ever! Your kids will love making their own ice cream and choosing their own flavor ingredients. 

The best part about this recipe is it’s a single serving and can be whipped up in minutes and ready to eat in as little as 3 hours. 

Having a birthday party/sleepover? Make it an ice cream party and let all the kids create their own flavors. Don’t forget to set up a topping bar for when their ice cream is ready to eat. 

Keep reading below to find out how to make...we give you two options of how to make it. Parents, you will most likely prefer the mixing bowl. But the kids will like to shake shake shake theirs up in mason jars.

What you will need....

1/2 cup heavy whipping cream
1 tsp of vanilla
2 tbsp granulated sugar

Directions

1. Mix up in bowl until it doubles in size and gets to a thicker consistency. Put in freezer safe container and feeze for 3 hours or until firm.

* Or you can...
(fun for kids to make their own)

2. Combine all ingredients into a mason jar. Shake until it doubles in size and gets to a thicker consistency. This can be from 5-10 minutes. Freeze for 3 hours or until firm.

(If having a party, be sure to mark the tops of your mason jars with each kiddos name)

Top with your favorite ice cream toppings.

More flavors...

You can also mix in your favorite flavors for different ice creams flavors.

• fresh strawberries mashed or any other fresh fruit
• cocoa powder
• mashed banana
• cookie dough
• candies

unlimited possibilities - mmmm

Recipe is for 1 serving. Can be doubled, tripled or more for more ice cream yumminess!!!

Read more
Cinnamon Roll Bites

Cinnamon Roll Bites

You only need a few simple ingredients for these yummy cinnamon roll bites. 

What you will need 

  • 1 can of biscuits 
  • cinnamon & sugar mixture
  • melted butter

Cut up your biscuits into bite sized pieces. Roll each one and dip in your butter then cinnamon and sugar mixture. Place on a greased class dish in a single layer. Cool at 350 degrees for 12-18 minutes depending on your oven. 

Make it better with frosting. 

What you will need

  • 1 cup of powdered sugar
  • 1/2 tsp of vanilla
  • 1/2 cup butter
  • add milk until desired consistency

Drizzle over the top of your cinnamon roll bites. 

***we triple our recipe often because we always have a house full of kids. These delicious bites go fast. But if for some reason you have some left over, they taste amazing cold too. 

Read more
Scrambled Pancakes

Scrambled Pancakes

Scrambled Pancakes


1. Mix your favorite pancake mix, we ya bisquick (follow directions in the box) Add in 1/4 c of cinnamon and sugar and 1 tsp of vanilla extract. Dye with your favorite color. (Be sure to add extra milk to thin your mix a bit)

2. Add 1-2 tbsp of butter to a frying pan. Pour in some batter and continue to stir as you would a scrambled egg. Cool your batter I still solid scrambled pancakes form. Remove into bowl and keep cooking more batter until all batter is scrambled. Don’t forget to add 1-2 tbsp of butter with each pan fry to keep batter from sticking.

3. Top your scrambled pancakes with powdered sugar, Brown sugar, syrup, chocolate chips, nuts or any other of your favorite toppings. We also like to drizzle them sometimes with a little extra butter. Mmmm

Other ideas...we have tried adding breakfast meats to our mix and it’s soooooo good. Makes for a nice sweet and savory dish. My favorite is fried ham. We have tried ham, bacon, sausage and spam so far.

Enjoy!!! These are fun to serve on Valentine’s Day and any other day you want a simple and fast breakfast.

Read more

Mother's Day Bouquet

Do you need a simple and quick gift you can make for mother's day this year!

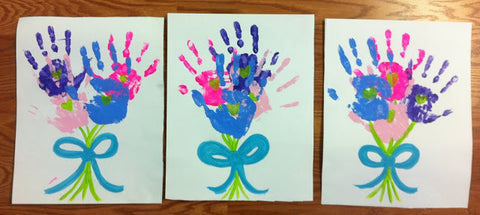
PAINTED HAND BOUQUETS


We made these up in a matter of minutes the other night! And they dry very quick too so you can make them and take them the same day!

I have 4 kids and had each of them put their hand print on the paper with different colors. We then added a bow and stems along with little hearts in the center of the hands.

These would also look cute on a long piece of paper showing each handprint as single flowers in a field.
They are so cute. Hope you find time to make some for your moms and grandmas in your life.

If you don't have time to mail these out for Mother's Day....take a pic and email or text your MOM a beautiful Bouquet!
xoxo, Tara
ps. Have you checked out our fun mommy and me designs in the shop? We have so many designs that "Mom" is sure to love. Mommy's Lil Bestie, Mom Style, The Mom, Love holding your hand, BFF designs and so much more.
Read more
Edible Cookie Dough - Shamrock Style

Edible Cookie Dough - Shamrock Style

Need something fun to make for Saint Patrick's Day with your kiddos? This recipe is perfect and so delicious. The kiddos will have fun making it and eating too!!

.....But be careful, the leprechaun's have been know for stealing this yummy treat if left unattended. 

...What you will need...

1 1/2 cups All Purpose Flour

2/3 cup White Cake Mix (original called for yellow)

1/4 teaspoon salt

1/2 cup unsalted butter (room temperature)

1/2 cup granulated white sugar

1 teaspoon vanilla extract

2 tablespoons sprinkles (optional, I used green)

4-8 tablespoons water

white chocolate chips (with a twist, see below)

Box of Andes mints, broken up

Green food coloring

Wax Paper

...Directions...


In a mixing bowl, cream together both the butter and sugar for 2-3 minutes or until fluffy and completely mixed. Stir in flour, cake mix, salt, and vanilla. Next drop in some of that green food coloring, stir and add more until you are satisfied with the color. Add as much or as little as you like. No need to go crazy, just being green is fun for St. Patricks Day! Add one tablespoon of water at a time, mixing after each tablespoon, until you reach cookie dough consistency.

Now you can mix in the fun stuff.
Sprinkles, green and white chocolate chips (see below on how to make the green chips) and andes mints. Anything fun and green related for St. Patricks day will do.

...Green Chocolate Chips...


Get some white chocolates chips and melt them in a microwave safe bowl or bottle. Mix in some green food coloring. Make these darker than your mix so they stand out a bit. If using a bowl, once melted and colored, add to a plastic bag, cut the tip off one end of the bag. If using a bottle, make sure you mix in that food coloring good. Sometimes I use the handle end of my spoon to get down in that bottle.
Now just grab some wax paper and begin making cute lil green chocolate chips. Once hardened, you can mix them into your edible mix.

Read more
The Best Country Gravy Mix Ever!

The Best Country Gravy Mix Ever!

The Best Country Gravy Ever! 


What you will need...

All Purpose Flour
Garlic Salt
Pepper
Chicken Seasoning
Chicken Stock
Butter
Milk
Bacon or Sausage


For your gravy mix...

2 c. All Purpose Flour
1 tbsp. Garlic Salt
1 tbsp. Pepper
1 tsp. Chicken seasoning

Sift together all ingredients and store in an airtight container. Can be stored for up to one year.

For your gravy...

Handful of Diced Bacon or Sausage Crumbles
3 tbsp. Gravy Mix
2 tbsp. Butter
1 1/2 c. Milk
1/4 c. Chicken Broth

Pan fry your bacon/sausage until done. Reduce heat to low. Add in remaining ingredients. Mix until there are no lumps and the gravy mix is all completely mixed in. Let gravy simmer and stir often until you get the right gravy thickness.

Serve over biscuits or anything else you love to smother with gravy. Yum. Enjoy!

Read more

Pumpkins and Ghosts - Window Painting

Do you have a window that needs some fun paintings for Halloween? We painted our window and wanted to share it with you.
Our back door has a plain glass window that I knew this project was perfect for. We use this door all the time and thought it would be fun to see something festive as we walked in the house.
What you will need....
  • Paint Pen - Black (Black paint works too. I just didn't have any at the time)
  • Orange, Green and White paint
  • Round Sponge Brush
  • Favorite Halloween Coloring Page or any black and white image you like.
I am not the greatest at freehand. So here is what I did.....

I found a larger pumpkin, lil pumpkin and a cute ghost online that was perfect. I printed the larger pumpkin in 3 different sizes and the ghost and lil pumpkin in one size.

To get started, I cut out each of the pumpkins and the ghost and taped them together on the door where I wanted them to go. (Tip...I taped it on the outside of the window. I would be painting from the inside.)


Start by tracing with your black paint/pen on the inside of the window. This was tricky for me because our window is double paned and I have to admit I got a little dizzy. LOL First I traced a quick thin line and when I was done, I went over it again using the thicker end of the pen. My lines are a little silly because of the dizziness. Hee Hee. But this was my first time. I am sure I'll get better. I am happy with it and it  turned out cute. Oh and I only needed one coat with the pen. With paint you will want to do a few layers and let dry in between.

Since I used the pen, and it dried quickly, I was able to paint the orange right away. So I grabbed a paper plate, squeezed some orange paint on there and used a round sponge to dap it on. I liked the look of the sponge too. Again only one layer was all it took for this step.


Finally, I added in the white on the ghost and the green stem for the little pumpkin at the bottom. Aside from the squiggly line on the pumpkins, I am pleased with how this turned out. Next time I will use black paint. But for now, I will just say that they are spooky pumpkins because of the ghost and that's why the pumpkins have a wiggle in them. Ha! Ha!


I think using the printed pages helped me with my tracing. Let me know what works for you.

What have you painted on your windows?

Read more

Sugar Cookie Dough - Edible Version Included

The best sugar cookie dough you will every make. YUMMY! And we included an edible version too!

Ingredients....

1 1/2 cups powdered sugar

1 cup butter, softened
1 tsp. vanilla
2 tbsp. milk ( 1 egg if baking )
2 1/2 cups all-purpose flour
1 tsp. baking soda
1 tsp. cream of tartar

Directions....

1. Beat sugar and butter in large bowl until smooth. Beat in vanilla and milk (egg if making cookies). Mix in remaining ingredients. Divide dough in half; wrap each and refrigerate 30 minutes until firm.

Next steps for baking....

1. Heat oven to 375•F. Lightly grease cookie sheets. Roll out dough on lightly floured surface to 1/4 - inch thick. Cut with cookie cutters. Arrange on cookie sheets 1/2" apart.

2. Bake 7-8 minutes until light brown. Cool slightly; remove to wire racks. Cool completely and frost, if desired.

Share and Enjoy!

Read more